Crochet Checkers Game

A few months ago, my fiancé and I went with my parents to a restaurant that had checkerboards scattered throughout the dining area. My dad (a checkers champ) challenged my fiancé to a game and (no surprise) my dad won.
For weeks after this, the two of them kept talking about a rematch, but we soon realized that none of us actually owned a checkers set. So naturally, as a person who hoards skein after skein of yarn, I decided I’d just crochet one. The only problem was, I couldn’t quite find the type of pattern I was looking for.

After searching around, I found some really nice patterns for crochet checkerboards, but all of them either seemed too big, too small, or just not quite the style that I was looking for. I decided the best option would be to create my own pattern, and this is what I came up with!
The board measures approximately 12’’ by 12’’ and is perfect for all levels of crochet as it uses only single crochets and slip stitches!
Materials List
The following list has all the supplies and tools you'll need to make this project.
These affiliate links help to keep Craftic running at no extra cost to you. Thank you for your support! 💛
Notes
Use yarn in 2 different colors that have enough contrast. In this project, I used Caron Simply Soft in Dark Country Blue and Heather Gray.
Checkered Board

With 1st color (blue in this project): Create a slip knot and ch 57.
(Note: Gauge isn’t hugely important with this project, but if you want a standard 12’’ by 12’’ board, make sure this measures approximately 12”).
Row 1: Skipping the first chain, sc in the next 5 chains. In your 6th chain, insert your hook and pull up a single loop. Here is where you will attach your 2nd color. Instead of pulling your 1st color through again as you normally would, pull your 2nd color through to complete the single crochet. (see below)
Checkered Board (cont'd)
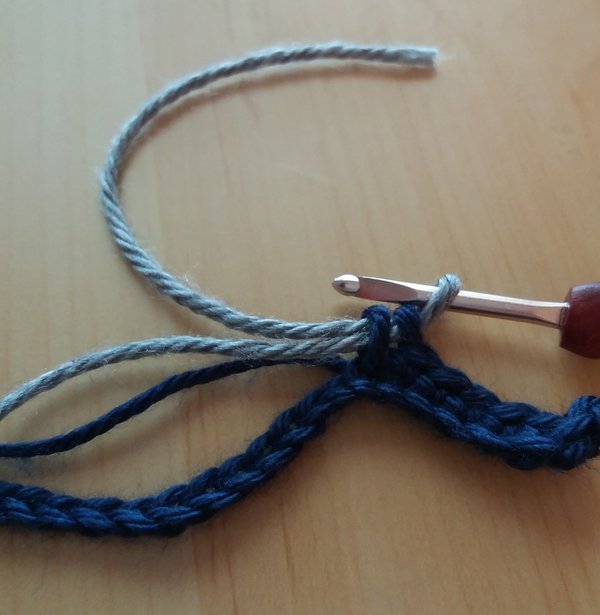
This completes the 6th stitch.
DO NOT CUT YOUR 1st COLOR. You will want to “carry” your 1st color through your next stitches so that your 1st color is waiting to be picked up again when you are ready for it.
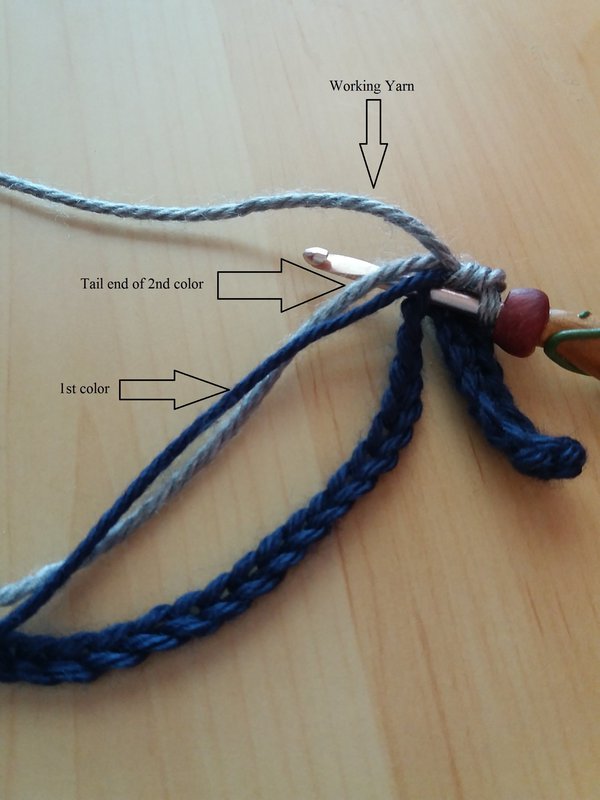
Here is what your first sc of your 2nd color will look like (7th st of Row 1). Note that the 1st color (blue) as well as the tail end of the second color (gray) have been single crocheted over. For further explanation of this, see image below:
Checkered Board (cont'd)

Carrying your yarn as you single crochet: Carry your yarn through your stitches by inserting your hook into the next chain and putting your hook under your 1st color (see picture—I also like to go under the tail end of my 2nd color in order to secure it, but you have the option of leaving the tail end where it is and sewing it in later.) Single crochet as normal, making sure to crochet over your 1st color each time.
Checkered Board (cont'd)
Sc a total of 5 stitches with your 2nd color. In the 6th st, insert your hook, bring up a loop, and complete the sc with your first color (which should be right there to pick up again).
Helpful Tip: Once you reach the end of each “box,” double check that your non-working yarn that you carried along is pulled tight so that you don’t have gray peeking through your blue boxes and vice versa.
You will repeat this process of single crocheting 5 stitches, inserting hook in 6th, and pulling up your alternate color to complete the 6th single crochet. You will do this a total of 8 times, and by the end of the row you will have a total of 48 sc.
Your first row should look like this:
Checkered Board (cont'd)

At the end of Row 1: DO NOT SWITCH COLORS as you have been throughout Row 1. Complete the single crochet with the same color, ch 1, and turn. (48)
Rows 2, 3, 4, 5, 6: Repeat Row 1
You will continue to not switch colors at the end of each row until Row 6.
These first 6 rows will create your first set of boxes.
In order to achieve the alternating color pattern of the boxes, you will need to switch colors after every 6 rows.
Once you get to the end of Row 6, you will complete the final crochet by inserting your hook in the last stitch, pulling up a loop, and completing the sc with your 1st color. Ch. 1 and turn.
Checkered Board (Cont'd)

Row 7: Continue with the same process as before (Sc 5 sts, insert hook in 6th, pull up a loop, complete sc with opposite color). Repeat this through Row 12. Remember to keep carrying your non-working yarn through!
After this, the pattern repeats itself. In Row 13, you will begin once again with your first color to start off the next set of boxes.
Checkered Board (Cont'd)

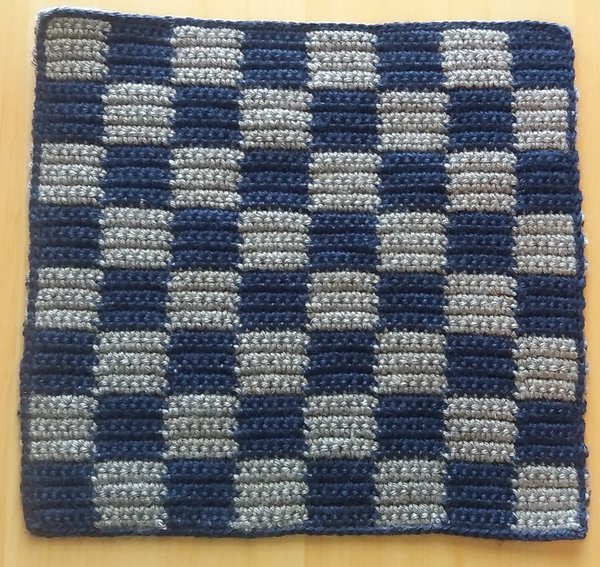
Repeat this process of alternating colors every six rows until you have a total of 48 rows (8 rows of boxes). Your board should look relatively square.
Checkered Board (Cont'd)

Fasten off and sew in ends. A border is totally optional for this project.
Finishing Board
I slip stitched around the edge of mine to create a more defined edge, but it’s up to you!
Game Pieces

Round 1: ch 4 and sl st into 1st chain. ch 1
Round 2: sc into center 8 times, sl st into 1st sc (8) ch 1, turn
Round 3: 2 sc in each sc from round 2 (16)
Sl st into 1st sc of round 3, fasten off, sew in ends.
Game Pieces (Cont'd)

Make 12 of each color. It never hurts to make a few extra if you’re prone to losing a few pieces here and there!
Addendum

The color combinations with this pattern are endless! You can do traditional black and red or even attach a new color after every 6 rows for a rainbow effect! I’d love to see this done with a solid yarn and an ombre or variegated yarn too!
🎉 Final Step: Show Off Your Work!
Post your WIP and finished project photos on Instagram. Add #crafticProjects and tag @crafticland for a chance to be featured on Craftic's social channels and newsletter.