Washi Tape Christmas Tree Cards

It's that time of the year where we send a bit of holiday cheer through some happy mail!
In this project, you will be upcycling packaging, making a cute card with custom message inside, and a matching envelope!
You'll learn how to quickly make your own holiday cards without having to spend a ton of time and money.
These holiday cards are easy for anyone to make. So, if you're a beginner or pro-crafter, you'll have lots of fun making these washi tape Christmas tree cards!
This post is sponsored by RubberStamps.com (affiliate link). Make sure to check them out for all of your stamping needs with literally hundreds of ready-made stamp designs, customize your own stamps, and stamping inks and accessories!
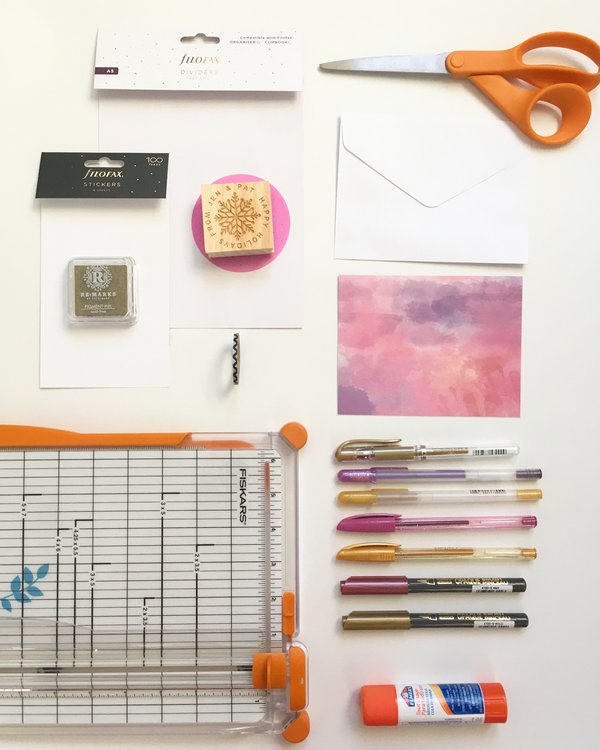
Materials List
The following list has all the supplies and tools you'll need to make this project.
These affiliate links help to keep Craftic running at no extra cost to you. Thank you for your support! 💛
- MT Washi Tape (Set of 20)
- Rainbow Blank Cards & Envelopes (Set of 100)
- 8.5" x 11" Cardstock Paper
- Elmer's All Purpose Glue Stick
- Blank Kraft Cards and Envelopes
- Colorful Set of Blank Cards and Envelopes
- Marvy Uchida Opaque Brush Marker - Metallic Set
- Fiskars All Purpose Scissors
- RubberStamps - Custom Snowflake Tag Stamp
- Zebra Z-Grip Glitter Pens (Set of 10)
- Fiskars Craft Paper Trimmer 12"
- RubberStamps - Gold Metallic Pigment Ink Pad
Step 1 - Gather Supplies
Before you get started, prep your work area so you can quickly make a batch of these cute washi tape cards!
Grab your favorite washi tapes, glittery and shimmery pens and markers, and your blank cards, and anything else you'll need.
Make sure to check out the Materials List section for my recommended supplies for this project!
Step 2 - Trim Packaging

Whenever you receive a package in the mail, check if you can keep it for future projects. Most of the time, there'll be some design on one side and blank on the other - perfect for using in place of white cardstock.
So, let's get sustainable and use up all that packaging you've been storing!
You'll want to leave some room for the blank card design to peek through so trim down the sheets at least an inch shorter and narrower than the card itself.
Using a paper trimmer or scissors, trim several sheets of packaging so you'll have a good amount to work with.
Step 3 - Washi Tape!

Using your washi tape, create one large triangle in the center and add two shorter triangles on either side of it. This is the start of your trees!
Work on all of the cardstock pieces and mix it up with the kinds of washi tape you use so each card can be unique! Alternatively, you can challenge yourself to finish one washi tape roll and make all the trees with the same design. :)
Step 4 - Add Doodles!

Use your sparkliest, glitteriest pens and markers for this step to make the cards pop.
For this step, draw a line down the center of each triangle to the bottom of the sheet. Next, add branches off the trunks to complete your tree doodles
You can free hand the lines or use a ruler - it's up to you!
Step 5 - Glue It Down!

Your artwork is ready to be displayed on your card!
Attach the cardstock to the center of the blank card using glue stick.
At this step, you can embellish your design with a cute star or other cute stickers.
Step 6a - Ink It (Your Stamp)!

Now, let's get ready to work on the inside of your new cards.
Using gold stamp ink, carefully apply ink to your holiday stamp.
Use an even amount of pressure and don't press down too hard! That way, you'll have a nice, clear image of your stamp.
Step 6b - Stamp It!

Stamp down the design gently with even pressure. This particular stamp design reads "Happy Holidays from Jen and Pat".
You can get your own custom holiday stamp - make sure to check out the Materials List for the link!
Step 6c - Personalized Cards

Voila - your personalized holiday stamp will make your card really shine - especially with that gold ink! Next, add a handwritten note and your card will be ready to send.
Step 7 - Matching Envelope

To create a matching card and envelope set, you can stamp the back of your envelope as well as add some pretty washi tape (and maybe a sticker too).
Your recipient will be so happy to see this land in their mailbox!
Step 8 - Experiment!

Feel free to explore all the color, texture, and pattern combinations you can think of!
As you can see here, you don't have to stick to traditional holiday colors. Have fun with this step and explore all the colors of the rainbow!
If you make these cards, make sure to share them on social and tag @crafticland and @rubberstamps_com :)
🎉 Final Step: Show Off Your Work!
Post your WIP and finished project photos on Instagram. Add #crafticProjects and tag @crafticland for a chance to be featured on Craftic's social channels and newsletter.