Gingerbread Crochet Ornament

Hi! I’m Fei, the crochet blogger behind “I Heart Gantsilyo”. I’m a long time crocheter, beginner knitter, and a newbie blogger. I learned how to sew and crochet when I was nine. Now that I’m already a mom, the crafting and crocheting continues and I really enjoy making all the things for my son. You can bet I’ve done a few baby apparel and plush toys for him! I also love sharing my work and inspiring others, so with lots of encouragement from my entire family and friends, I decided to start my own blog about my crafty yarn adventures!
Today, I’m excited to be here on Craftic to share with you a little something to add on your Christmas trees and get you into the Holiday spirit! I’ve been seeing a lot of adorable amigurumi gingerbread man ornaments on Pinterest, and I just couldn’t wait to try my hand at making one. So with only a few days left before Christmas I made this very simple crochet gingerbread man that you can make in a flash. I used Dapper Dreamer comb cotton yarn by Gantsilyo Guru Selections in “gingerbread” color for this project, but any worsted weight yarn will produce a cute result!
Materials List
The following list has all the supplies and tools you'll need to make this project.
These affiliate links help to keep Craftic running at no extra cost to you. Thank you for your support! 💛
Abbreviations/Stitches
sc - single crochet (US) / dc - double crochet (UK)
st(s) - stitch(es)
sl st - slip stitch
inc - increase
inv dec - invisible decrease
Notes
Finished gingerbread man ornament measures approximately 6 inches. Any variations to hook size and yarn weight will result in a different sized piece.
Every separate piece will be worked in continuous rounds. Do not join rounds with a slip stitch or chains unless otherwise stated.
Mark the first stitch of each round by using a stitch marker or a piece of yarn.
Inv dec - invisible decrease (Insert the hook into front loops only of next 2 stitches, catch yarn and pull through 2 loops on hook, catch yarn again then pull through final 2 loops on hook. Now you have two single crochet together, counts as 1 single crochet).
Pattern
ARMS (make 2):
Begin with a magic ring.
Round 1: sc 6
Round 2: inc 6 times (12 sts)
Round 3: sc around
Round 4: sc around
Round 5: sc around
Round 6: sc around
Round 7: sc around
Fasten off and leave a short yarn tail. Set both piece aside for later attaching.
LEGS (make 2):
Begin with a magic ring.
Round 1: sc 6
Round 2: inc 6 times (12 sts)
Round 3: sc around
Round 4: sc around
Round 5: sc around
Round 6: sc around
Round 7: sc around
Fasten off and leave a short yarn tail. Repeat the same steps to make the second leg but do not fasten off, do not cut yarn.
Pattern (Cont'd)

BODY
Round 1: Join legs with a single crochet in the first stitch of Round 7 of the first leg. Place your stitch marker in the single crochet stitch you just made (counted as your first stitch for the body), sc in each of the remaining 11 sts of first leg and in the next 12 sts of second leg (24 sts)
Pattern (Cont'd)
Round 2: sc around
Round 3: sc around
Round 4: sc 5, inv dec, sc 10, inv dec, sc 5 (22 sts)
Round 5: sc around
Round 6: sc 4, inv dec, sc 10, inv dec, sc 4 (20 sts)
Round 7: sc around
Round 8: sc 4, inv dec, sc 8, inv dec, sc 4 (18 sts)
Round 9: sc around
Round 10: sc 4, inv dec, sc 7, inv dec, sc 3 (16 sts)
Round 11: sc 3, inv dec, sc 7, inv dec, sc 2 (14 sts)
Round 12: sc 3, inv dec, sc 5, inv dec, sc 2 (12 sts)
Do not fasten off, proceed to next steps to crochet the head.
HEAD
Round 1: [sc, inc] 6x (18 sts)
Round 2: [sc 2, inc] 6x (24 sts)
Pattern (Cont'd)

At this point, sew each arm at the side between Round 7 to Round 12 of the body using whip stitch method (total of 12 whip sts from front to back of each arm).
Pattern (Cont'd)
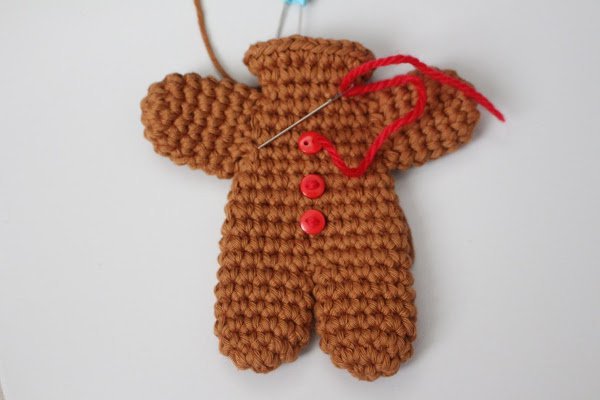
Now is the best time to sew the 3 buttons onto the center of the body. This way, you will be able to hide the stitches inside the work. Once done, continue to next Rounds.
Pattern (Cont'd)
Round 3: sc around
Round 4: sc around
Round 5: sc around
Sew the white buttons between Round 5 and Round 6 of head. Once done continue to next steps to complete the head.
Round 6: [sc 2, inv dec] 6 times (18 sts)
Round 7: sc around
Round 8: [sc, inv dec] 6 times (12 sts)
Round 9: inv dec 6 times
Cut yarn leaving a long tail. If you prefer to crochet the string that you can use to hang the ornament, make sure to leave atleast 2.5 feet long yarn tail. Fasten off then weave through the stitches of last round. Pull tail end gently to close the gap. Crochet 20 chain stitches or more then slip stitch in the any stitch of previous round. Fasten off and hide tail.
Finishing
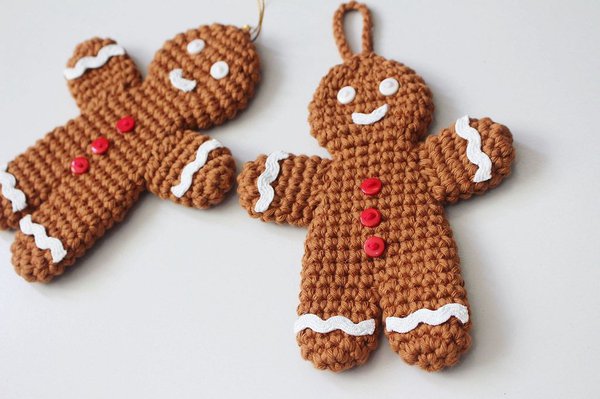
Lastly, cut out some zigzag ric rac lace ribbon then attach on both arms and legs as shown on photos using fabric glue.
I hope you enjoy this little cute man! I also have a few other patterns on my blog for you to try out, hop on over! I would also love to see your work! Please use the hashtag #iheartgantsilyo on Instagram or share on our Facebook page.
Happy Crocheting!
🎉 Final Step: Show Off Your Work!
Post your WIP and finished project photos on Instagram. Add #crafticProjects and tag @crafticland for a chance to be featured on Craftic's social channels and newsletter.